Can you help? My photography website isn't working, so I know I need to update it. Everyone tells me I should use WordPress to build a new photography website and blog because it's great for SEO and there's a great choice of themes. But I'm technically-challenged and have no idea where to start! Please show me how to build a photography website with WordPress so I can get my site up and running quickly…
Brenda C. ~ Portrait and wedding photographer
Oh man, if I had a nickel for every time I've heard that question 🙂
If you're like Brenda, you don't need me to tell you what a daunting idea it is to create your own photography website or blog from scratch.
Whenever you research starting a website, you instantly get buried in a ton of weird terminology and gobbledegook.
No wonder those handy template-based websites feel so tempting, especially to anyone with a new photography business.
Solutions such as Wix, Weebly, and even Squarespace look great on the surface with their fancy drag-and-drop systems that even a toddler could use.
But…
Such convenience can come at a hefty price.
Poor SEO (search engine optimization) features, inefficient code, the inability to use custom scripts, designs that are simply not meant for marketing a business, to name but a few, all add up to frustration and strict limitations further down the road.
Which is why my only recommendation for a photography website platform is WordPress.
In fact, according to a report from the web technology survey company W3Techs, WordPress now powers at least 25% (28% according to WordPress themselves) of all websites.
Why is it so popular?
WordPress has been around for a long time. It's matured into a stable and robust content management system (CMS) that can handle any website you can dream up. With a vast array of plugins and themes, there's no limit on what you can do with it.
Anyway, enough background info, here are my 5 simple steps that show you exactly how to build a photography website with WordPress.
And you won't drive yourself crazy in the process.
You'll be surprised at how simple it is to get started.
Step 1: Your Domain And HostingOne thing that confuses a lot of people from the start is there are two flavors of WordPress available:
The difference is simple.
The wordpress.com solution means that your website is hosted on the wordpress.com domain (even if you choose one of their premium plans). They control the software used to run your site, so you're essentially renting your place on the web.
Self-hosted WordPress, on the other hand, means that you have own your domain and you have full control of the software hosted on it. In short, you can do whatever you want with it.
Therefore, just to be clear, the best solution for all professional photographers is #2 because you'll avoid the limitations imposed by wordpress.com and you'll get the full SEO benefits your site deserves.
Choosing A Domain NameYour domain name is your website's address on the Internet.
Every website needs a domain name in order for people to find it. For example, the domain name for this website is primefocuslab.com, so you can think of the domain name as being the same as the website name.
Your domain name is important because this is how people will remember your website.
Here are a few guidelines to consider:
Your domain name doesn't have as much impact on your search rankings as it used to, so buying a domain name just because it has useful keywords in it isn't a wise choice.
For example, "bestmemphisweddingphotographer.com" would offer no SEO advantage. In fact, it would most likely have a negative impact on SEO because the key phrase has a spam-like feel to it.
You can register your domain name in a lot of places, but the best and most convenient choice is to register it with your hosting company at the same time you buy your hosting plan.
Website HostingThere are literally thousands of web hosting companies out there, so you have a lot of choice.
To start with, you don't need anything fancy or complicated.
You can start with the least expensive plan and upgrade in the future, if needed.
In fact, you'll most likely find that the least expensive plan will serve you for a long time.
The only time you'll need to upgrade will be if you run out of storage space on your website for photos and other content, or you get so many visitors each day that your monthly data transfer limits are exceeded.
Where Should You Buy Website Hosting?

How To Build A Photography Website With WordPress: Bluehost is my recommendation for website hosting. Great pricing, awesome features, and solid support.
I recommend Bluehost.
Not only are they super-affordable, you can easily register your domain name, and install WordPress in less than 5 minutes.
Even their most basic plan offers lots of space and unlimited bandwidth so you don't have to worry about high traffic volumes.
Plus, they have excellent support if and when you need it.
Want to know if your desired domain is available?
You can use this handy name checker tool to find the perfect domain name for your new website:
Step 2: Install WordPressAt first, everyone assumes this will be the hardest step because it sounds like a job for a technical expert.
In reality, it's the quickest and easiest part of the whole process.
Once you have your new domain and hosting account ready in Bluehost, all you need to do is use their 1-click WordPress install, and you're ready to move on to step 3.
To make sure you have the latest information, refer to these detailed instructions on how to install WordPress on your hosting account using Bluehost's Marketplace.
Step 3: Basic Configuration SettingsWhen you first install WordPress, your system will be set up with some basic default settings.
You'll need to change some of these, as follows.
#1: PermalinksA permalink (also sometimes referred to as a "slug") is short for "permanent link" and is simply another word for a URL.
We have permalinks in WordPress because every page or post that a visitor sees is actually constructed on demand from data in the WordPress database, not from a distinct HTML file.
WordPress creates a unique URL for each page or post based on the permalink structure specified in the settings.
To set this up correctly, go to your WordPress dashboard and click on "Settings –> Permalinks".
You should see something like this:

How To Build A Photography Website With WordPress: The permalink settings screen for WordPress.
The default setting is "plain", which uses the internal post ID as a parameter. This kind of permalink isn't very pretty and not at all useful for SEO purposes.
Instead, you should change the setting to "post name", as indicated by the red highlight above, and then click on "Save Changes".
WordPress will then automatically update the internal URL structure to use real words for the URLs instead of numbers.
#2: General SettingsYou may need to adjust some of the general settings.
You can find these (naturally enough) by going to "Settings –> General" from your WordPress dashboard menu.
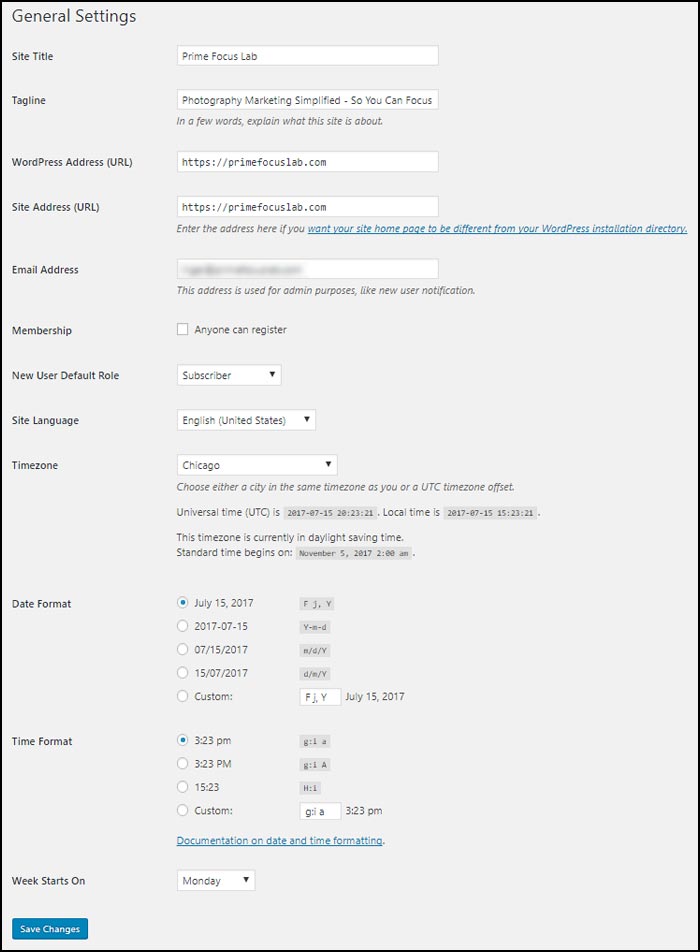
How To Build A Photography Website With WordPress: The general settings screen from your WordPress dashboard.
Make sure the site title and tagline are correct, and that your email address is the one you want WordPress to use when sending important admin notifications etc.
You should make sure the box labelled "Anyone can register" is unchecked to prevent unwanted users signing up and potentially gaining access to your system.
Choose the correct timezone for your location, and review the other settings according to your preferences.
Click the "Save Changes" button when you're done.
#3: Discussion SettingsOne of the best features of WordPress from the beginning was the ability for readers to leave comments on your pages and posts.
Unfortunately, this was ruined by spam commenters who thought comments were a great way to spread their ridiculous links to spam-ridden content across the web.
Rather than waste tons of time dealing with unwanted spam comments, and because most of the comments we tend to see these days aren't all that useful anyway, it might be a good idea to turn off comments altogether in your WordPress setup.
To do this, go to "Settings –> Discussion" to edit the settings relating to comments.
Here's what the top part of the discussions settings page looks like:
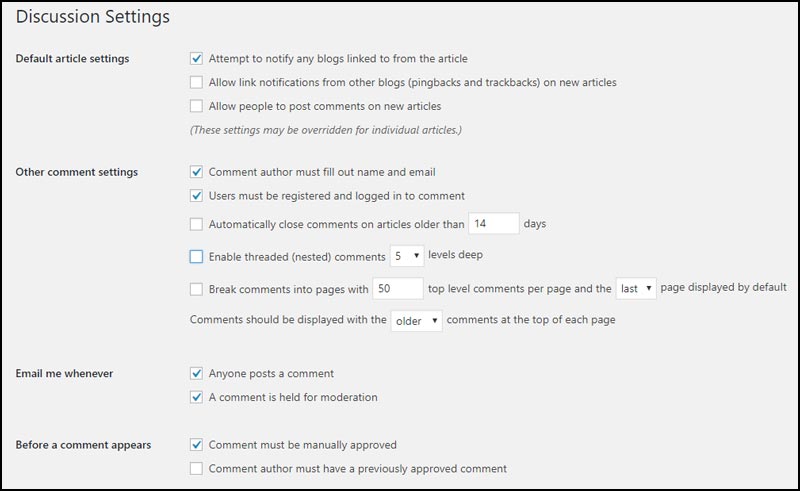
How To Build A Photography Website With WordPress: The discussions settings page in the WordPress dashboard.
If you wish, you can copy these settings as you see here to your WordPress settings, and then click "Save Changes" at the bottom of the page.
These settings make sure that no one can post a comment to your blog through the normal channels. If they somehow manage to post a comment through a system backdoor of some kind (this can happen occasionally, especially if there are any security loopholes), then it won't be published unless you approve it first.
That about covers the basic settings, so it's time to move on to the next step.
Step 4: Install Some Essential PluginsPrograms that extend the basic core functionality of WordPress are called "plugins", and there are many thousands of them available, for all kinds of purposes.
Fortunately, there are only a few that I consider essential for a photography website.
There are two simple ways to install a plugin:
Here are the plugins I recommend, in no particular order of importance:
Yoast SEO (Free)
How To Build A Photography Website With WordPress: Use the Yoast SEO plugin to boost and improve your website SEO
WordPress on its own is quite good with search engine optimization (SEO).
However, there are still a few gaps. You can improve your SEO considerably by implementing a solid SEO plugin to help you create better content that has a better chance of ranking well in the search engines.
This is where the Yoast SEO plugin comes in.
With this plugin, you can specify detailed SEO information for every page or post you create, giving you full control over your website's appearance in the search index.
Use method #1 above to install this plugin by searching for "Yoast SEO".
Gravity Forms (Premium)
How To Build A Photography Website With WordPress: The business license version of the Gravity Forms plugin is perfect for quickly creating awesome forms, and connecting them to your email marketing company.
At some point you'll want a way for visitors to communicate with you or sign up to your email list.
The best plugin, by far—for both tasks—is Gravity Forms.
This plugin allows you to create awesome-looking forms in just a few minutes. It's not free, but it's the one plugin I wouldn't be without.
If you plan to use email marketing in the future (hint: you should!), you can easily link a signup form created with Gravity Forms to your email marketing company (for example, my top recommendation: ActiveCampaign). For this, you'll need the business license version of Gravity Forms.
Once you've purchased the plugin, download the zip file they provide to your computer.
Then use method #2 above to install the plugin inside WordPress.
Social Warfare Pro (Premium)
How To Build A Photography Website with WordPress: The Social Warfare Pro plugin makes social sharing easier than ever.
Social media is a large part of every business' marketing plan these days.
But, it's difficult to get people to share your content on the right social networks.
Worse, most of social sharing plugins suffer from problems, or don't work well at all.
This is where Social Warfare comes to the rescue.
I went through one plugin after another—all with problems—until I finally found Social Warfare.
For a small annual fee, it's worth every cent and more.
Once you've purchased the plugin, download the zip file they provide to your computer.
Then use method #2 above to install the plugin inside WordPress.
Google Analytics For WordPress By MonsterInsights (Free)"You can't improve what you don't measure…"
If you don't track your website usage stats, you won't know what to fix.
Google Analytics is the industry standard for this task.
This Google Analytics plugin makes it easy to set it up correctly.
Use method #1 above to install this plugin by searching for "Google Analytics For WordPress By MonsterInsights".
NextGen Pro (Premium)Most photographers want a gallery page on their website…
After all, it's a great way to show off your work.
But the problem is, most of the gallery plugins out there leave a lot to be desired.
Not so with NextGen Pro from Imagely.
Here's a quick video from Imagely, that explains more about NextGen Pro:
Find out more about NextGen Pro.
Step 5: Choose Your ThemeYour theme determines the look and feel of your WordPress website and blog.
Like plugins, you can choose from thousands of themes, which can be confusing.
There are also free themes (some of which are included with WordPress) and premium themes. There are pros and cons to each, but you typically get what you pay for.
Free themes offer limited features, and are not usually designed with business in mind. They also come with limited (or no) support.
Premium themes do require a one-time upfront cost. However, they are usually well-coded and many are built specifically for business. You get good support in most cases, if needed, and you can customize them further.

How To Build A Photography Website With WordPress: Choose a quality premium theme from the folks at StudioPress.
My recommendation for WordPress is always to avoid free themes, and invest in a quality premium theme.
Among the premium themes available, my primary recommendation is to start with a Genesis-based theme from StudioPress.
Why StudioPress?
Genesis is a WordPress theme framework, upon which child themes are built to further customize the look of the theme.
These themes power a huge number of websites, and are built with efficiency and robustness firmly in mind.
This website is powered by a theme I built myself on the Genesis framework, and I've never had a single problem with it.
For those reasons, it's the only theme system I recommend.
Check out the wide array of themes at StudioPress, I promise you won't be disappointed.
How To Build A Photography Website With WordPress: SummaryIn this article, on how to build a photography website with WordPress, we talked about:
After you complete the 5 basic steps I outlined here, you'll have a working website and blog built with WordPress.
What Next?This is just the beginning, and there's a whole lot more to learn about blogging and using WordPress for your website.
The key is to take things one step at a time.
If you need help with any of this, consider joining my VIP all-access pass membership.
Inside, you'll find in-depth marketing courses, blogging courses, and you get access to me directly to get your questions answered.
Thanks for reading, and I hope this has been helpful.
Enjoy your WordPress adventure 🙂
![]()
Nigel MerrickPhotography Marketing Simplified

Source: How To Build A Photography Website With WordPress (5-Step Guide)
No comments:
Post a Comment