WordPress.com is a limited version of WordPress run by Automattic. Here, you can create a blog or website in moments without worrying about hosting and managing your WordPress. However, to use many more complex plugins and functionality, and to have the full breadth of customization you desire, you may at some point decide to use the full WordPress platform available from WordPress.org and "self-host" it – host it on your own server, or pay a company for hosting services.
Moving your blog from the "managed hosting" at WordPress.com to a self-hosted installation of the full WordPress platform requires a little planning, and some time, but can definitely be worth it in the end.
For the most part, getting your content out of WordPress.com is a fairly easy task. What is not easy, though, is matching your design from WordPress.com, and trying to replicate what you had on that platform on the new one.
If you happened to choose one of the themes that are built for WordPress.com by the team at Automattic, then you may be out of luck if it's not available in the WordPress.org repository. Consider launching a new theme design for your site along with the move. However, if that's not an option and you are very attached to your current WordPress.com site's appearance, there are two ways you can go about replicating this look on your own hosting.
As for exporting other features, some, like menus, are only possible if you export using the "all content" option, and will require minor tweaks upon import to the new WordPress installation. Most plugins that you had before (and thousands more) can be found in the WordPress.org repository, and with thanks to the Jetpack plugin, you can enable the social functions, subscriber, and statistics from WordPress.com. This will allow you to take advantage of the desktop and mobile apps to help publish and manage your site on the go.
There are some elements that are not currently possible to export: custom fonts, widgets, and some site settings (such as the site permalink structure). For the most part, you will be able to replace the fonts with something similar after the content import, or even use a fonts plugin or custom inclusion to add the same one back in. You will read about handling the migration of your permalink structure later in this post.
Lastly, if you used a custom domain name on WordPress.com and will be using it with the new site as well, don't forget to change your name servers, or even transfer the domain name away from WordPress.com to another provider so you can continue to use the domain for the future without needing to login to WordPress.com to alter settings.
In order to do the export in the quickest amount of time, this step-by-step guide requires two things. The first is a functioning site on WordPress.com that contains at least one blog post or page (so we have something to export), preferably with images uploaded and embedded in the post. The second is a new WordPress install on your favorite hosting provider.
Getting StartedFirst, log in to your WordPress.com account.
First you need to make sure your site has been set to "public". This gives the necessary permissions that allow the import on your installation to download the images and other media attached in the posts and pages. Without this step, you will need to access your media library, and download a copy of each item in the media library and manually upload and reattach to each post and page (a time consuming job).
To do this go to My Site > Settings > Privacy, and select Public, then save settings.
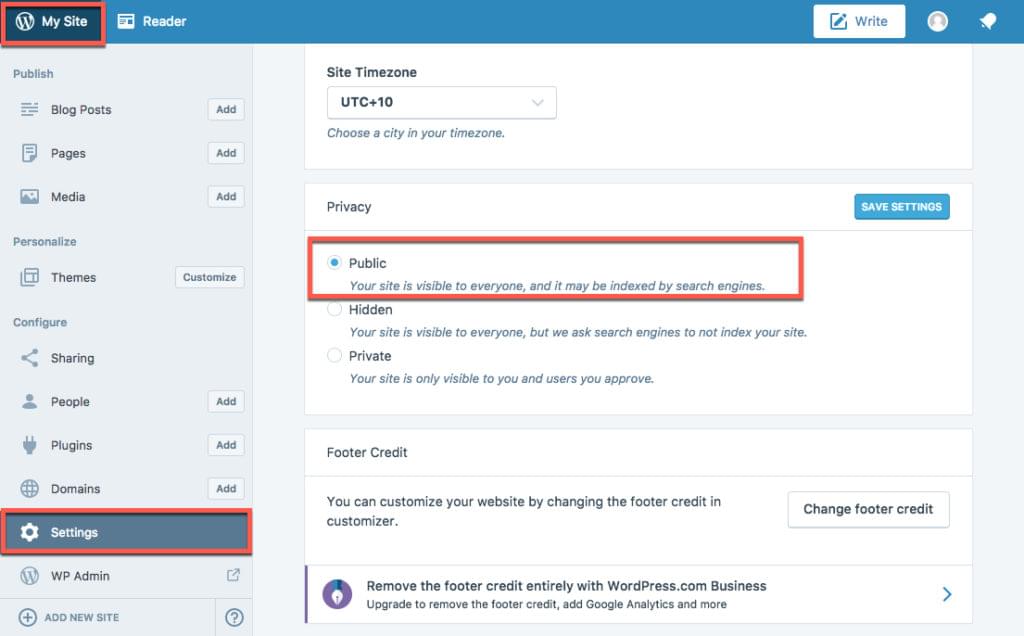
Note that the above image is of my own WordPress.com account where I manage a few different sites. From this account dashboard, you can also perform exports. The only difference is the fact that WordPress sends an email with a link to the finished file for download.
After accessing the admin area of the particular site in question, under the "Tools" menu, select the submenu "Start Export".

From here you will need to decide what exactly you would like to export. You could export all elements in one go, but for bigger sites, I recommend splitting this up, and only exporting portions of the site at once (i.e. pages, then posts), and for even bigger sites, exporting based on authors, or published posts followed by drafts, etc. The key here is to plan what to export, and then manage the files for importing.

There are elements that you won't have on your self-installed sites. If you don't wish to install the Jetpack plugin, for instance, exporting the Feedback, Testimonial, or Projects/Portfolio sections will be unnecessary. They are part of WordPress.com (and of the Jetpack plugin on self-hosted WordPress) and not a standard part of the WordPress platform.
If you did want a portfolio section and have original content in your WordPress.com site, but didn't want to use Jetpack, because of differences in table names, I suggest installing Jetpack for the migration, then afterwards install your prefered portfolio plugin, and copy and paste content into the new area. After that, you could delete Jetpack's content before finally deactivating and uninstalling the unwanted plugin.
By default, you won't see the testimonial and Projects sections in the export list, if they aren't enabled in the settings page, so don't worry if you don't have them enabled. If you weren't using them, then they will not be included in the export of "all content" or individual exports.

One main reason I recommend splitting out the posts from the pages for larger sites is that sometimes the images don't get imported correctly, or they get corrupted in some way. So, breaking it down into sections makes for easier troubleshooting if required, and less wasted time from having to delete all posts and pages and start again. But the caveat to this is that you can't export menus separately – the only option is via the "all content" export feature if you need to export and import your menus rather than rebuilding them.
Just make your selection, and click "Download Export File". There really is no right or wrong here, if you don't like the import, just dump and delete the posts/pages, and create a new export file and do it again.
An XML file will be downloaded to your computer.
Migrating from WordPress.com Using Your Exported DataNow that you have made sure your old site is public accessible and you have your exported content, log in to your new hosted WordPress website. For best results, install the theme and plugins that add the same functionality as your old site. You also need to change the permalink settings to match your WordPress.com site structure for the blog.
Change the settings to day and name, this matches the default WordPress.com permalink structure. If in the future you want to change this, you should also setup a 301 redirect plugin, add a header and footer plugin to insert your Google Analytics tracking codes, and setup a Google Search Console account to monitor broken links, and old page structures that need redirecting or creation, as well as other important notifications from Google about your site, this ultimately will help the search engines and users find the changed URLs. But during the import, you'll want things to work as similarly to your old WordPress.com site as possible for simplicity's sake.

Now it is time to import your content! To do this, navigate to "Tools" then "Import". The first time you do this, you will install the WordPress importer plugin. The next time you use it, you will just see "Run Importer".

Select your XML file from your computer, and click "upload file and import".

You are immediately presented with the ability import the existing users into the site (select nothing), to assign the posts to a new user (enter a new username) or to assign it to your admin user. Be careful here; if you have more than one author you need to select nothing, so that all previous authors are added to the site, with their correct posts assigned to them. Choosing a user will override any previous author information from the export.
In this example, I have only one user, and don't wish to make another user, but instead want to re-assign all posts and pages to my new admin user. In the highlighted box below, I will select my current admin user. Also tick "Download and import file attachments", this is needed to get your media out of your WordPress.com account into your new media library.
Now hit submit and wait and wait till you see the next notification. The time this will take depends on how much content you have, the size and quantity of your media, and other networking factors of your hosting platform.

When it has finished importing it will remind you to update any imported users. By default, as a security measure all new imported users will be made "Subscribers". You can then change their roles, passwords, etc from the Users section.

We are almost done, now we need to verify things went smoothly and the next steps needed to get everything running right.
First, double-check that the correct number of posts and pages and other custom post types are now inside your new site.

Then check that the images and attachments were imported into your media library.

Create the menu (or assign the menu to the correct area in the theme if you imported it), assign widgets, and copy over any data that was in your widget areas from the old WordPress.com site, because as noted above, this is not included in the export file.
Lastly we need to verify that the images embedded in your posts are actually loaded from your new site's media library, and not still being loaded from the WordPress.com site.
To do this, I first check that the site loads on the frontend and that the content is appearing. When hovering over featured images, they match the correct URL of the new site. I next verify each of the posts/pages in the editor, using text mode. The reason for this is to look for the site url in the image attachments. If this is wrong, it will stand out to you (you could also use the search field in your browser to highlight the URL wordpress.com, to save some time – it shouldn't appear on the new site). Whereas if you look in visual mode you won't see the difference until that image is either deleted, or you change the privacy setting on the WordPress.com site to private.
After all checks are done, and you have confirmed that all your data is moved across, you can simply make your WordPress.com account hidden. Don't delete it, because as I mentioned earlier, if you want to use JetPack for stats and the desktop and mobile apps, you will need a WordPress.com account to activate and sync to your new site. You can also enable other services offered by WordPress.com, such as VaultPress (backups) and Akismet (spam protection) if you desire.
But wait, don't forget that your users will still be going to https://twentyseventeendemo.wordpress.com/, (your WordPress.com sub-domain) and you need to setup a redirect to the new address (this only applies if you didn't buy and map a custom domain name). You don't have access to the server so you will have to use the paid option found here to pay for the redirection to take place. https://wordpress.com/domains/add/site-redirect/ it only costs a couple of dollars each year. Like when you move to a new house and have your mail redirected, you can choose to keep paying for this re-direction, or, sometime in the future, stop. I suggest you have a plan in place as to what you are wanting to do, and start updating your links around the web to point to the new correct location for your site. This includes reaching out to old contacts and give them the new link. It will save your bottom dollar in the long run, and is the perfect time to talk to those contacts about your business, blog or services.
Troubleshooting TipsAs mentioned earlier, for bigger sites I like to export sections of the site instead of using the all content export. One common problem is the importing of images. If you site is really big, just dumping the posts and starting again can be painful after an error. Thankfully, other solutions exist in the form of plugins that aid in downloading of your externally linked images, importing them into the media library and attaching it to the posts instead. One plugin I recommend is Image Teleporter. It can help import images (beyond just helping with migration errors), as they suggest in their page, it can also be used to bring in embedded images from services like Flickr, Instagram, or Pinterest, so they are hosted locally for a faster site.
Does the WordPress Importer plugin repeatedly fail for your bigger sites? If so, the developers over at Human Made that work mainly on VIP WordPress customers developed a WordPress import fork that works really well for larger WordPress imports. Recently it also came to my attention that you can perform migrations using the VaultPress backups from your WordPress.com account. To do this you need to be on a paid tier that includes backups, but from this, instead of restoring backups to the WordPress.com site, you can restore to your self-hosted, Jetpack connected site. This is a method of importing to a self-hosted environment that I will be testing in the future.
Have any personal experiences with moving from WordPress.com to a self-hosted installation? Share them in the comments below!
Source: Migrating from WordPress.Com to Self-Hosted WordPress
No comments:
Post a Comment